Is your prized plant looking a little lackluster? Understanding plant nutrient deficiencies is crucial for healthy growth. This guide will equip you with the knowledge to identify six key visual symptoms, helping you diagnose the problem and restore your plant’s vibrant health. We’ll explore visual cues, delve into soil and plant tissue testing methods, and provide practical solutions for addressing and preventing future deficiencies.
From recognizing subtle color changes in leaves to understanding the role of soil testing, we’ll unravel the mysteries behind plant nutrition. We’ll compare common deficiencies like nitrogen, phosphorus, and potassium, showing you how to interpret the signs and choose the right course of action. This detailed approach will empower you to become a confident plant caregiver, ensuring your green companions thrive.
Visual Symptoms of Nutrient Deficiency

Diagnosing plant nutrient deficiencies often relies heavily on observing visual symptoms. These symptoms, while sometimes subtle, can provide valuable clues to identify the lacking nutrient and guide appropriate corrective actions. Recognizing these visual cues is crucial for maintaining healthy plant growth and yield.
Six Key Visual Symptoms of Nutrient Deficiency
Several key visual symptoms consistently appear in plants suffering from nutrient deficiencies. These symptoms, when observed carefully, can help pinpoint the specific nutrient the plant is lacking. It’s important to remember that multiple deficiencies can occur simultaneously, making diagnosis more challenging. In such cases, a combination of symptoms will be observed.
- Chlorosis (Yellowing): This is a general symptom of nutrient deficiency, particularly nitrogen, magnesium, iron, and sulfur. It’s characterized by a yellowing of the leaves, often starting with the older leaves in the case of mobile nutrients like nitrogen. The veins may remain green initially.
- Necrosis (Browning and Tissue Death): Necrosis manifests as brown or dead patches on leaves or stems. This is often a later-stage symptom, indicating severe nutrient deficiency. It can be accompanied by leaf curling and wilting.
- Stunted Growth: A general lack of nutrients will lead to stunted growth. Plants may be smaller than expected for their age, with shorter internodes (the spaces between leaf nodes) and reduced overall size.
- Leaf Curling: Leaves may curl upwards or downwards, depending on the specific nutrient deficiency and the plant species. This is often associated with potassium, magnesium, or calcium deficiencies.
- Purple Pigmentation: In some cases, a purplish coloration can develop on leaves, particularly on the undersides or stems. This is often associated with phosphorus deficiency, especially under cool conditions.
- Leaf Drop: Premature leaf drop is a common symptom of severe nutrient deficiencies. The plant sheds its leaves to conserve energy and resources in an attempt to survive.
Comparison of Nitrogen, Phosphorus, and Potassium Deficiencies
Nitrogen, phosphorus, and potassium are macronutrients crucial for plant growth. Their deficiencies exhibit distinct visual symptoms.
| Nutrient | Symptom | Plant Example | Image Description |
|---|---|---|---|
| Nitrogen (N) | General chlorosis (yellowing) starting with older leaves; stunted growth; pale green or yellow leaves; reduced branching | Corn | A corn plant showing overall yellowing of leaves, particularly the older, lower leaves. The younger leaves may appear slightly greener, but still paler than healthy corn. The plant is noticeably smaller than expected for its age. |
| Phosphorus (P) | Dark green or purplish leaves; stunted growth; delayed maturity; poor root development; reduced flowering and fruiting | Tomato | A tomato plant exhibits dark green to purplish discoloration on its lower leaves. The plant is smaller than normal and shows limited fruit production. The leaves may have a slightly bluish cast. |
| Potassium (K) | Chlorosis and necrosis (browning) at leaf margins; leaf curling; weakened stems; reduced fruit size and quality; increased susceptibility to disease | Lettuce | A lettuce plant shows browning and scorching at the edges of its older leaves. The leaf margins are crisped and brown, while the inner leaf tissue remains relatively green. The plant shows overall weakness and reduced leaf size. |
Leaf Color Changes Indicating Nutrient Deficiencies
Chlorosis and necrosis are crucial indicators of nutrient deficiencies. The pattern and location of these color changes often point to the specific nutrient lacking.
- Nitrogen Deficiency: Causes a general chlorosis, starting with the older leaves. This is because nitrogen is a mobile nutrient, and the plant relocates it from older leaves to younger, actively growing ones when deficient.
- Iron Deficiency: Leads to interveinal chlorosis, meaning the yellowing occurs between the leaf veins, which remain green. This is because iron is not easily mobile within the plant.
- Magnesium Deficiency: Causes chlorosis that begins between the veins of older leaves, often progressing towards the leaf margins. The veins may remain green initially, but eventually, the entire leaf may turn yellow or even brown.
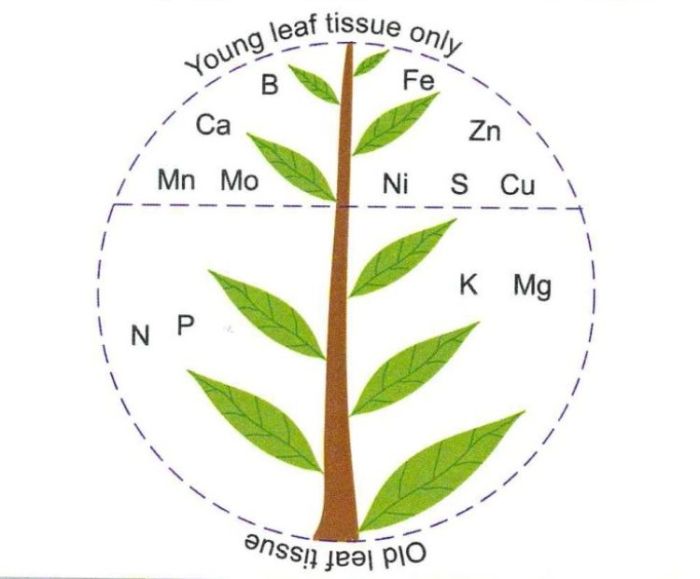
Identifying Nutrient Deficiencies Through Soil and Plant Tissue Testing

Diagnosing nutrient deficiencies accurately requires more than just observing visual symptoms on plants. Soil and plant tissue testing provide crucial quantitative data to complement visual observations, leading to a more precise diagnosis and effective remediation strategies. These tests offer insights into the nutrient levels available to the plant and the plant’s actual uptake of these nutrients, respectively.
Soil Sampling Procedures
Proper soil sampling is paramount for obtaining reliable results. A representative sample must be collected to accurately reflect the nutrient status of the entire area. This involves taking multiple samples from different locations within the area of interest, combining them, and then taking a subsample for analysis. The depth of sampling should be consistent with the root zone of the plants being assessed. For example, for shallow-rooted plants, a sample depth of 0-6 inches might suffice, while deeper-rooted plants may require sampling to a depth of 0-12 inches or even deeper.
After collecting the soil samples, it’s crucial to prepare them correctly for analysis. This typically involves air-drying the soil to prevent microbial activity from altering nutrient levels. Once dried, the soil is sieved to remove rocks, debris, and large organic matter, ensuring a homogenous sample for testing. The prepared sample is then sent to a certified laboratory for analysis. The laboratory will determine the levels of various essential nutrients, such as nitrogen (N), phosphorus (P), potassium (K), calcium (Ca), magnesium (Mg), sulfur (S), and micronutrients like iron (Fe), manganese (Mn), zinc (Zn), copper (Cu), boron (B), molybdenum (Mo), and chlorine (Cl).
Plant Tissue Analysis Procedures
Plant tissue analysis provides direct information about the nutrient status within the plant itself. This complements soil testing, as it reflects the plant’s actual nutrient uptake, irrespective of the nutrient levels in the soil. The interpretation of plant tissue analysis results requires careful consideration of the plant species, growth stage, and the specific nutrient being analyzed. Different plants have different nutrient requirements at various growth stages.
A detailed step-by-step procedure for plant tissue analysis is as follows:
- Sample Collection: Collect representative plant tissue samples from healthy and symptomatic plants. The type of tissue collected (leaves, stems, petioles) depends on the nutrient being investigated and the plant species.
- Sample Preparation: Clean the collected samples to remove soil and debris. Subsequently, the samples are thoroughly washed and then oven-dried at a low temperature (around 65-70°C) to prevent nutrient loss.
- Sample Grinding: Once dried, the plant tissue is ground into a fine powder to ensure homogeneity before analysis.
- Laboratory Analysis: The ground sample is sent to a laboratory for analysis, which determines the concentration of various essential nutrients.
- Results Interpretation: The laboratory report provides the nutrient concentrations. These values are then compared to established reference ranges for the specific plant species and growth stage to identify any deficiencies.
Comparison of Soil Testing and Plant Tissue Testing
Both soil and plant tissue testing offer valuable information but have distinct advantages and disadvantages.
| Method | Advantages | Disadvantages |
|---|---|---|
| Soil Testing | Provides information about the overall nutrient availability in the soil; Relatively inexpensive; Can be used for proactive nutrient management. | Does not directly reflect the plant’s actual nutrient uptake; Can be affected by soil factors such as pH and organic matter content; May not accurately reflect nutrient availability in all soil types. |
| Plant Tissue Testing | Directly reflects the plant’s nutrient status; Provides a more accurate diagnosis of nutrient deficiencies; Useful for identifying nutrient imbalances. | More expensive than soil testing; Requires more technical expertise for sample collection and interpretation; May not reveal the cause of nutrient deficiency (e.g., soil immobility). |
Addressing and Preventing Nutrient Deficiencies

Correcting nutrient deficiencies and preventing future occurrences are crucial for healthy plant growth. This involves understanding how to amend your soil, select appropriate fertilizers, and implement sound soil management practices. By following a proactive approach, you can significantly improve your plants’ health and yield.
Amending Soil to Correct Nutrient Deficiencies
Identifying the specific nutrient deficiency is the first step. Once you know which nutrient is lacking (e.g., nitrogen, phosphorus, potassium), you can choose the appropriate amendment. Soil testing provides the most accurate assessment. However, visual symptoms can often indicate the general direction. Amending the soil involves adding the deficient nutrient back into the soil. This can be done through the application of fertilizers or soil amendments.
- Identify the Deficiency: Accurate identification, ideally through soil testing, is key. Visual symptoms provide clues but aren’t definitive.
- Choose the Right Fertilizer: Select a fertilizer containing the deficient nutrient(s). For example, if nitrogen is low, use a high-nitrogen fertilizer (e.g., urea, ammonium nitrate). For a balanced approach, consider a complete fertilizer (N-P-K) that provides all essential nutrients.
- Determine Application Rate: Follow the fertilizer package instructions carefully. Application rates vary depending on the type of fertilizer, soil type, and plant needs. Always start with the recommended rate and avoid over-fertilizing.
- Application Method: Methods include broadcasting (spreading evenly over the soil surface), side-dressing (applying along the plant rows), or foliar feeding (spraying the leaves). Foliar feeding is best for quick uptake but may not address long-term deficiencies.
- Incorporate the Fertilizer: For granular fertilizers, lightly till the fertilizer into the top few inches of soil. For liquid fertilizers, water them in thoroughly to prevent burning the plant roots.
- Monitor and Adjust: Observe the plants’ response to the amendment. If symptoms persist, re-test the soil or adjust the fertilizer application rate accordingly. Regular monitoring is crucial for long-term success.
Preventing Nutrient Deficiencies
Preventing nutrient deficiencies is far easier and more efficient than correcting them. Proactive soil management and appropriate fertilization practices are vital. Ignoring these can lead to reduced yields, stunted growth, and susceptibility to diseases.
- Regular Soil Testing: Conduct soil tests annually to assess nutrient levels and pH. This provides a baseline for fertilization decisions.
- Proper Fertilization: Use fertilizers appropriate for your plants and soil type. Follow package instructions carefully and avoid over-fertilizing.
- Organic Soil Amendments: Incorporate organic matter like compost, manure, or leaf mold to improve soil structure, water retention, and nutrient availability. This also enhances the soil’s microbial activity, which is essential for nutrient cycling.
- Crop Rotation: Rotate crops to prevent depletion of specific nutrients in the soil. Different plants have different nutrient requirements.
- Mulching: Use mulch to retain soil moisture, suppress weeds, and gradually release nutrients into the soil as it decomposes.
- Appropriate Plant Selection: Choose plants that are well-suited to your soil type and climate. Some plants are more tolerant of poor soil conditions than others.
Creating a Nutrient Management Plan
A nutrient management plan ensures that your plants receive the right nutrients at the right time. This plan should be tailored to the specific plant and its growth stages.
| Growth Stage | Nutrient Needs | Fertilizer Type | Application Rate |
|---|---|---|---|
| Seedling | High Phosphorus (P) for root development | 10-20-10 | 1/4 cup per plant |
| Vegetative Growth | Balanced NPK (e.g., 10-10-10) | 10-10-10 | 1/2 cup per plant every 2 weeks |
| Flowering/Fruiting | Higher Potassium (K) for fruit and flower development | 10-10-20 | 1/2 cup per plant every week |
Final Summary
Diagnosing plant nutrient deficiencies effectively involves a combination of keen observation, scientific testing, and proactive preventative measures. By mastering the art of recognizing visual symptoms, utilizing soil and tissue analysis, and implementing sound nutrient management strategies, you can ensure your plants receive the essential nourishment they need to flourish. Remember, a healthy plant is a happy plant, and with the right knowledge, you’ll be well-equipped to nurture your green friends to their full potential.