A persistently overheating computer can signal serious trouble, from minor performance hiccups to catastrophic hardware failure. Understanding the root cause is crucial, and thankfully, diagnosing the problem isn’t as daunting as it might seem. This guide provides a straightforward, four-step process to pinpoint the source of your computer’s overheating and implement effective cooling solutions, ensuring your system runs smoothly and efficiently for years to come.
We’ll explore common causes, ranging from dust buildup and faulty fans to demanding software and inefficient power settings. Learn to identify overheating components using monitoring software, implement effective cleaning and cooling strategies, and optimize your system’s software for reduced heat generation. By following these steps, you’ll gain the knowledge and skills to keep your computer cool and prevent costly repairs.
Identifying Overheating Sources
Computer overheating is a common problem that can lead to performance issues, data loss, and even hardware failure. Understanding the sources of this heat is crucial for effective troubleshooting. This section will explore common causes, both internal and external, and guide you through a visual inspection process.
Overheating stems from a mismatch between the heat generated by your computer components and the system’s capacity to dissipate that heat. Internal factors relate to the components themselves and their efficiency, while external factors often involve environmental conditions and inadequate cooling solutions.
Visual Inspection for Dust and Damaged Components
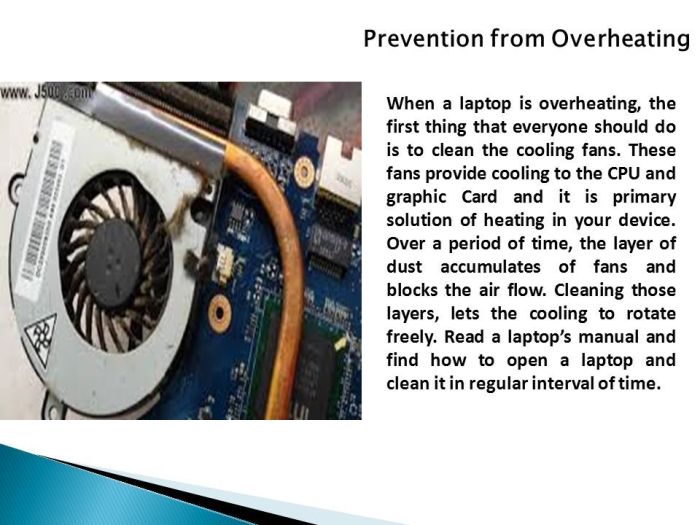
A thorough visual inspection is the first step in diagnosing overheating. Dust accumulation is a major culprit, acting as an insulator and hindering heat dissipation. Damaged components can also generate excessive heat or fail to function correctly, contributing to the problem. The following table Artikels a systematic approach:
| Step | Description | Potential Problem | Solution |
|---|---|---|---|
| 1 | Open the computer case (carefully, following manufacturer instructions) and examine the interior. | Excessive dust accumulation on components, fans, and heatsinks. | Use compressed air to carefully clean dust from all components, paying special attention to fans and heatsinks. Avoid using excessive force. |
| 2 | Inspect the CPU heatsink and fan. | Dust buildup, loose mounting, or a malfunctioning fan. The thermal paste might be dried out or improperly applied. | Clean the heatsink and fan thoroughly. Ensure the heatsink is securely mounted and the fan spins freely. Consider reapplying thermal paste if necessary. |
| 3 | Examine the GPU (if applicable). | Dust accumulation on the heatsink and fan, or a malfunctioning fan. | Clean the GPU heatsink and fan thoroughly. Ensure the fan spins freely. |
| 4 | Check all other internal components for any signs of damage, such as bulging capacitors or burnt markings. | Damaged components generating excessive heat or failing to function properly. | Replace any damaged components. This often requires professional assistance. |
Component-Specific Overheating Scenarios
Several scenarios illustrate how specific components contribute to overheating:
A CPU with insufficient cooling (e.g., a poorly applied thermal paste or a failing CPU fan) will run significantly hotter than normal, leading to throttling or system instability. A high-end GPU under heavy load (e.g., during gaming or video editing) can generate substantial heat if its cooling solution is inadequate. Similarly, a failing case fan can restrict airflow, causing temperatures across all components to rise.
Using Monitoring Software for Temperature Identification
Monitoring software provides real-time temperature readings for various components. Programs like HWMonitor, Core Temp, and MSI Afterburner allow you to track CPU, GPU, and other component temperatures. If any component consistently operates above its recommended maximum operating temperature (often specified by the manufacturer), it indicates a potential overheating problem. For example, a CPU consistently running above 90°C (194°F) under normal load warrants immediate attention. Similarly, a GPU consistently operating above 80°C (176°F) during gaming could indicate a problem with the cooling system.
Implementing Cooling Solutions
Addressing overheating requires implementing effective cooling solutions. This involves understanding the different cooling methods available, properly maintaining your system’s cleanliness, and optimizing airflow within the computer case. Proper thermal paste application is also crucial for efficient heat transfer.
Air Cooling versus Liquid Cooling
Choosing between air and liquid cooling depends on your budget, technical skills, and desired performance levels. Air cooling is generally simpler and more affordable, while liquid cooling offers superior cooling capabilities for high-performance components.
- Air Cooling:
- Pros: Relatively inexpensive, easy to install and maintain, quieter operation at lower loads.
- Cons: Less effective at dissipating high heat loads, can be noisy under heavy load, limited cooling potential for extreme overclocking.
- Liquid Cooling:
- Pros: Superior cooling performance, quieter operation under heavy load, enables higher overclocking potential.
- Cons: More expensive, more complex installation, potential for leaks, requires more maintenance.
Dust Removal and Internal Cleaning
Regular dust removal is essential for maintaining optimal cooling. Dust buildup acts as an insulator, preventing heat from dissipating effectively. Always power down your computer and disconnect it from the power source before proceeding. Use an anti-static wrist strap to prevent damage to components.
- Preparation: Gather necessary tools: compressed air canister (with a long straw), a soft brush, and a microfiber cloth.
- Disassembly: Carefully open the computer case. Consult your computer’s manual for specific instructions. Gently remove any easily accessible components, such as the graphics card, RAM modules, and hard drives, to improve access for cleaning.
- Cleaning: Use compressed air to blow dust away from fans, heatsinks, and other components. Direct the airflow from the inside of the components outward to prevent dust from being pushed deeper into the system. Use a soft brush to gently remove stubborn dust. Avoid using excessive force.
- Reassembly: Carefully reassemble all components, ensuring that everything is securely connected. Double-check all connections before powering on the system.
Airflow Optimization
Effective airflow is crucial for efficient cooling. Proper fan placement and cable management help to direct air over heat-generating components.
A diagrammatic representation: Imagine a rectangular box (the computer case). Place an intake fan (arrow pointing inwards) at the front bottom of the box, drawing cool air in. Position an exhaust fan (arrow pointing outwards) at the rear top, expelling hot air. A second exhaust fan could be added to the top front or side panel to increase airflow. Arrange cables neatly and strategically to avoid blocking airflow pathways. Avoid bunching cables in front of intake fans.
Thermal Paste Application
Thermal paste facilitates heat transfer between the CPU/GPU and the heatsink. Applying the correct amount is crucial for optimal performance. Too little paste results in poor heat transfer, while too much can cause excess pressure and damage components.
- Preparation: Clean the CPU/GPU and heatsink surfaces with isopropyl alcohol and a lint-free cloth. Ensure both surfaces are completely clean and dry.
- Application: Apply a small pea-sized amount of thermal paste to the center of the CPU/GPU. Do not spread it.
- Mounting the Heatsink: Carefully mount the heatsink, ensuring even pressure across the surface. The pressure will spread the thermal paste evenly.
Software and Usage Optimization
Overheating isn’t solely a hardware problem; software and usage patterns significantly impact your computer’s temperature. Resource-intensive processes, inefficient operating system settings, and demanding applications can all contribute to excessive heat generation. Optimizing these aspects can dramatically reduce your computer’s temperature and improve its overall performance.
Software processes, particularly those running in the background, often consume considerable CPU and GPU resources. This increased activity translates directly into higher temperatures. Identifying and managing these processes is crucial for effective thermal management. Furthermore, optimizing your operating system settings to reduce energy consumption can lead to lower power usage and, consequently, less heat.
Resource-Intensive Software Processes
Identifying software that consistently uses high amounts of resources is the first step to mitigating overheating caused by software. Common culprits include video editing software, 3D modeling programs, gaming clients, and certain web browsers with numerous extensions. Task Manager (Windows) or Activity Monitor (macOS) allow you to monitor CPU and memory usage in real-time. By observing which applications consistently rank high in resource consumption, you can pinpoint potential sources of overheating. Consider closing unnecessary applications or limiting their background activity.
Operating System Optimization for Reduced Energy Consumption
Several operating system settings directly influence energy consumption and, subsequently, heat generation. The following steps can help optimize your system:
- Reduce screen brightness: Lowering screen brightness significantly reduces power consumption.
- Disable unnecessary startup programs: Many applications automatically launch on startup, consuming resources even when not actively used. Review your startup applications and disable those not essential.
- Adjust power plan settings: Most operating systems offer various power plans (e.g., High Performance, Balanced, Power Saver). Selecting a power-saving plan reduces CPU clock speed and performance, but also significantly lowers heat generation.
- Enable sleep mode: Utilize sleep mode or hibernation to reduce energy consumption when the computer is idle.
- Turn off unused hardware: If possible, disable or disconnect unused peripherals like external hard drives or printers when not needed.
Power Management Plan Comparison
Different power plans significantly affect CPU temperature and performance. The following table illustrates a typical comparison (values are illustrative and can vary depending on the system’s hardware and software configuration):
| Power Plan | CPU Temperature (°C) | Performance (Benchmark Score) |
|---|---|---|
| High Performance | 75-85 | 15000 |
| Balanced | 60-70 | 12000 |
| Power Saver | 45-55 | 8000 |
Managing Demanding Applications and Games
For applications and games that are inherently resource-intensive, several strategies can help prevent overheating:
- Reduce graphical settings: Lowering graphical settings in games (e.g., resolution, texture quality, shadows) significantly reduces GPU load and heat generation.
- Limit background processes: Close unnecessary applications before launching a demanding game or application to free up system resources.
- Use application-specific optimization settings: Many applications offer their own settings to optimize performance and reduce resource consumption.
- Consider using a dedicated graphics card: For gaming and other graphically intensive tasks, a dedicated graphics card will handle the load, reducing stress on the CPU and mainboard.
Final Conclusion

Successfully diagnosing and resolving your computer’s overheating issues empowers you to maintain optimal system performance and extend the lifespan of your hardware. By combining careful visual inspection, effective cleaning techniques, strategic cooling solutions, and software optimization, you can ensure your computer runs smoothly and reliably. Remember, proactive maintenance is key to preventing future overheating problems and avoiding costly repairs down the line. Regular cleaning and monitoring are simple yet effective ways to keep your system running at peak efficiency.