A car’s crankshaft position sensor is crucial for engine operation; a malfunction can lead to frustrating starting issues, poor performance, or even complete engine failure. Understanding how to diagnose a faulty sensor is essential for any car owner, saving time and money on unnecessary repairs. This guide provides five reliable tests to pinpoint the problem quickly and efficiently, allowing you to get back on the road with confidence.
We’ll explore common symptoms indicating a failing sensor, differentiating them from issues with other engine components. Each diagnostic test will be detailed step-by-step, including necessary tools and safety precautions. We’ll also analyze how to interpret the results, guiding you through potential next steps if the problem persists after initial troubleshooting.
Symptoms of a Faulty Crankshaft Position Sensor

A malfunctioning crankshaft position sensor (CKP sensor) can lead to a range of frustrating driving experiences. This crucial component monitors the engine’s crankshaft rotation, providing essential data to the engine control unit (ECU) for precise fuel injection and ignition timing. When it fails, the consequences can range from minor inconveniences to complete engine failure. Understanding the common symptoms can help you diagnose the problem early and avoid more significant damage.
A faulty CKP sensor often manifests in several ways, making accurate diagnosis crucial. The symptoms can vary in severity and presentation depending on the specific vehicle and the nature of the sensor failure. Sometimes the symptoms might be subtle, while other times they are quite dramatic and leave you stranded.
Symptom Comparison Table
Understanding the symptoms of a bad crankshaft position sensor requires differentiating them from issues with other car parts. The following table helps illustrate this:
| Symptom | Crankshaft Position Sensor Issue? | Likely Cause | Solution |
|---|---|---|---|
| Engine won’t start | Highly Likely | CKP sensor is completely failed, preventing the ECU from receiving the necessary signals to initiate the ignition process. | Replace the CKP sensor. |
| Engine cranks but won’t start | Very Likely | The ECU is receiving intermittent or incorrect signals from the CKP sensor, preventing proper ignition timing. | Inspect and potentially replace the CKP sensor, check wiring and connections. |
| Rough idling | Possibly | Weak or intermittent signal from the CKP sensor leading to inconsistent fuel delivery and ignition timing. Could also be a problem with spark plugs, ignition coils, or vacuum leaks. | Diagnose the issue further. Inspect the CKP sensor, spark plugs, ignition coils, and check for vacuum leaks. |
| Stalling | Possibly | The CKP sensor is providing unreliable data, causing the ECU to mismanage fuel and ignition timing, resulting in engine stalling, particularly under load or at low RPMs. Could also indicate issues with fuel pump, fuel filter, or MAF sensor. | Check the CKP sensor and associated wiring. Investigate fuel system components and the MAF sensor. |
| Check Engine Light illuminated (with related codes) | Possibly | The ECU has detected a fault with the CKP sensor or its circuit. The specific trouble codes will vary depending on the vehicle’s make, model, and year. | Use an OBD-II scanner to read the trouble codes and diagnose the issue. Replace the CKP sensor if necessary. |
| Poor fuel economy | Possibly | Inconsistent fuel delivery due to faulty CKP sensor data causing inefficient combustion. Could also be due to other factors such as tire pressure, driving habits, or other sensor malfunctions. | Check fuel economy after addressing other potential issues. Replace CKP sensor if other causes are ruled out. |
Symptom Variation Across Vehicles
The symptoms of a faulty CKP sensor can vary slightly depending on the vehicle’s make, model, and year. For example, some vehicles might exhibit a noticeable misfire or hesitation under acceleration, while others might only show a check engine light. Older vehicles might not have as sophisticated ECU systems, leading to simpler, more easily recognizable symptoms, such as complete engine failure. Newer vehicles, with their more complex electronic systems, might display a wider range of less obvious symptoms. The specific diagnostic trouble codes (DTCs) reported by the ECU will also vary depending on the vehicle’s computer system and its programming. A professional mechanic with access to vehicle-specific diagnostic tools is best equipped to pinpoint the exact cause in these instances.
Diagnostic Tests for a Crankshaft Position Sensor

Diagnosing a faulty crankshaft position sensor (CKP sensor) requires a systematic approach. Several tests can pinpoint the problem, ranging from simple visual inspections to more involved electrical checks. Remember to always disconnect the negative battery terminal before performing any electrical tests to prevent accidental shorts or damage.
Visual Inspection of the Crankshaft Position Sensor
A visual inspection is the simplest first step. This helps identify obvious physical damage that might be causing malfunction.
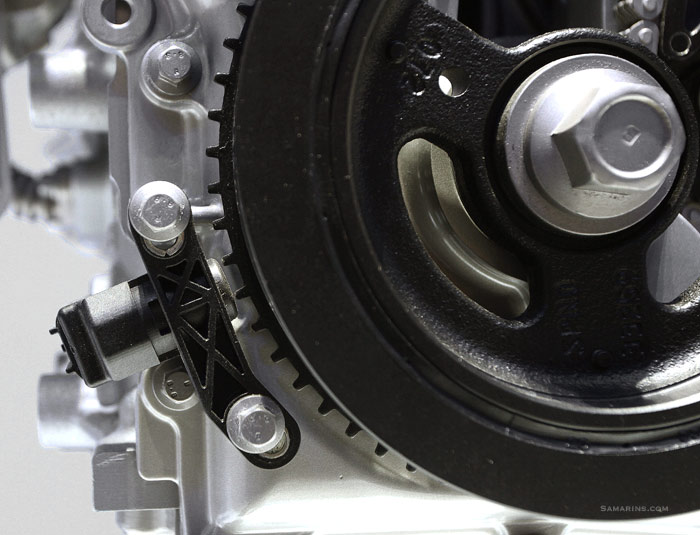
- Step 1: Locate the CKP sensor. Its location varies depending on the vehicle’s make and model, but it’s usually found near the crankshaft pulley or flywheel.
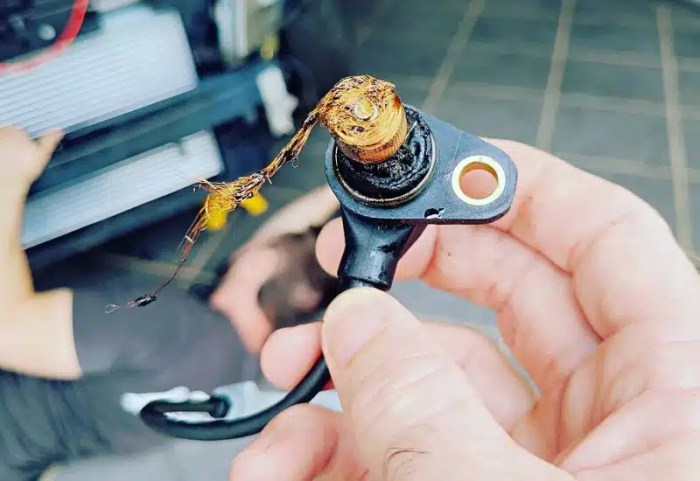
- Step 2: Carefully examine the sensor for any visible damage such as cracks, broken wires, corrosion, or loose connections.
- Step 3: Check the sensor connector for any signs of damage, including bent pins, corrosion, or loose connections. A loose or corroded connector can disrupt the signal.
- Step 4: Inspect the wiring harness leading to the sensor for any fraying, cuts, or signs of rodent damage. Damaged wiring can also interfere with sensor operation.
Testing the Crankshaft Position Sensor Connector
This test checks for continuity and voltage within the sensor’s connector.
- Step 1: Disconnect the CKP sensor connector from the sensor.
- Step 2: Using a multimeter set to the ohms setting, check for continuity between the sensor’s signal wire and the ground wire. A reading near zero ohms indicates a good connection; a very high or infinite reading suggests a break in the circuit.
- Step 3: Check the voltage between the sensor’s power wire and the ground wire. A reading near the battery voltage (usually around 12V) indicates power is reaching the sensor. Lack of voltage indicates a problem in the power supply circuit.
Checking the Crankshaft Position Sensor Signal with an Oscilloscope
An oscilloscope provides a visual representation of the sensor’s output signal. This is the most accurate test.
- Step 1: Connect the oscilloscope probes to the sensor’s signal wire and a ground point. Refer to your vehicle’s service manual for the correct signal wire location.
- Step 2: Crank the engine. A healthy CKP sensor will produce a specific waveform, which is unique to each vehicle. Consult your vehicle’s service manual or online resources for the expected waveform.
- Step 3: Compare the observed waveform to the expected waveform. Significant deviations, such as missing pulses or irregular patterns, indicate a faulty sensor.
Resistance Test of the Crankshaft Position Sensor
This test verifies the sensor’s internal resistance, which should fall within a specific range. This range is specified in the vehicle’s repair manual.
- Step 1: Disconnect the CKP sensor connector.
- Step 2: Using a multimeter set to the ohms setting, measure the resistance between the sensor’s signal wire and ground. Compare this reading to the specifications in the vehicle’s service manual.
- Step 3: A reading outside the specified range indicates a problem with the sensor’s internal components.
Comparison of Diagnostic Tests
The visual inspection is the least conclusive, only identifying gross physical damage. The connector test is simple but may not detect subtle internal sensor issues. The oscilloscope test offers the most precise diagnosis, but requires specialized equipment. The resistance test is straightforward, but the acceptable resistance range is highly vehicle-specific.
Interpreting Test Results and Next Steps
Understanding the results of your crankshaft position sensor (CKP) tests is crucial for accurate diagnosis and repair. The tests Artikeld previously will provide data that indicates whether the sensor is functioning correctly or requires replacement. Correct interpretation minimizes unnecessary part replacements and ensures efficient troubleshooting.
Interpreting the results involves comparing your readings against known good values for your specific vehicle. Manufacturer specifications or online resources can often provide this information. A systematic approach, using a flowchart, can guide you through the decision-making process.
Typical Test Results
Successful tests will yield readings consistent with manufacturer specifications. For example, a voltage test might show a steady voltage within the expected range (e.g., 4.5-5.5V) when the engine is cranked, while a waveform test on an oscilloscope will display a clear, consistent signal pattern with appropriate amplitude and frequency. Conversely, a faulty CKP sensor might show erratic voltage fluctuations, a weak or absent signal, or a waveform that is distorted, intermittent, or completely absent. A resistance test might reveal a value significantly outside the specified range. These discrepancies indicate a malfunctioning sensor.
Decision-Making Flowchart
The following flowchart illustrates the decision-making process after each test:
Start
→ Voltage Test: Voltage within specified range?
→ Yes: Proceed to Waveform Test. No: Check wiring and connections; retest. If still faulty, replace CKP sensor.
→ Waveform Test: Clear, consistent waveform?
→ Yes: Sensor likely functioning correctly. Investigate other potential causes of the problem. No: Replace CKP sensor.
→ Resistance Test: Resistance within specified range?
→ Yes: Sensor likely functioning correctly. Investigate other potential causes of the problem. No: Replace CKP sensor.
End
Troubleshooting Inconclusive Results or Persistent Problems
If the initial tests are inconclusive or the problem persists after replacing the CKP sensor, several additional troubleshooting steps are necessary. These might include:
- Verify proper installation: Ensure the new CKP sensor is correctly installed and securely fastened. A loose or improperly seated sensor can lead to malfunction.
- Inspect wiring harness: Carefully examine the wiring harness connecting the CKP sensor to the engine control module (ECM) for any damage, breaks, or corrosion. Repair or replace damaged wiring as needed.
- Check the ECM: In rare cases, a faulty ECM can mimic the symptoms of a bad CKP sensor. Diagnosis requires specialized tools and expertise, often necessitating professional assistance.
- Inspect the crankshaft: While less common, damage to the crankshaft’s reluctor ring (the component the CKP sensor reads) can cause similar symptoms. Visual inspection or more advanced diagnostic techniques may be required to assess the crankshaft’s condition.
- Review vehicle-specific diagnostics: Consult a repair manual or use an OBD-II scanner to access vehicle-specific diagnostic trouble codes (DTCs). These codes can provide valuable clues about the underlying cause of the problem, even if the CKP sensor has been replaced.
Conclusion
Diagnosing a faulty crankshaft position sensor doesn’t have to be daunting. By systematically applying these five tests and understanding the potential symptoms, you can effectively identify the problem and take appropriate action. Remember safety first – if you’re uncomfortable performing these tests yourself, consult a qualified mechanic. Armed with this knowledge, you can approach engine problems with increased confidence and potentially save on costly repairs.