A blank screen or a flickering image can quickly disrupt productivity. Understanding the common causes of computer monitor issues empowers you to troubleshoot effectively, saving time and potential repair costs. This guide provides a structured approach to diagnosing and resolving various monitor problems, from simple connection issues to more complex hardware failures. We’ll walk you through four key steps to get your display working optimally again.
By systematically investigating potential problems, from loose cables to internal component malfunctions, you can pinpoint the source of the issue and implement the appropriate solution. Whether you’re dealing with a blurry image, lines on the screen, discoloration, or a complete lack of display, this guide provides the knowledge and steps to navigate the troubleshooting process efficiently and confidently.
Identifying the Problem
Troubleshooting monitor issues begins with accurately identifying the problem. A clear understanding of the visual defect will significantly narrow down the potential causes and guide your troubleshooting efforts. This section will Artikel common monitor problems, their causes, and initial troubleshooting steps.
Monitor problems can range from a complete lack of display to subtle visual distortions. Understanding these differences is crucial for effective diagnosis.
Common Monitor Problems and Troubleshooting
The following table summarizes common monitor problems, their potential causes, initial troubleshooting steps, and likely solutions. Note that these are general guidelines, and the specific solution may vary depending on the monitor model and the underlying issue.
| Problem | Possible Cause | Troubleshooting Steps | Likely Solution |
|---|---|---|---|
| No Display | Power cable unplugged, faulty power supply, dead monitor, loose connection, faulty graphics card | Check power cable connection to both monitor and wall outlet; check power supply; test with a different monitor; inspect cable connections; try a different graphics card (if applicable). | Replace faulty component (cable, power supply, monitor, graphics card). |
| Blurry Image | Incorrect resolution settings, loose cable connection, damaged cable, failing monitor panel | Adjust resolution settings in operating system; check cable connection; try a different cable; consider professional repair or replacement. | Adjust resolution; replace cable or monitor. |
| Flickering Display | Loose cable connection, faulty cable, failing monitor backlight, incompatible refresh rate, driver issues | Check cable connection; try a different cable; adjust refresh rate in display settings; update graphics drivers. | Replace cable or monitor; adjust refresh rate; reinstall drivers. |
| Lines on Screen | Failing monitor panel, damaged cable, graphics card issue | Try a different cable; check for physical damage to the monitor screen; consider professional repair or replacement. If the problem persists with a different cable, it may indicate a graphics card issue requiring further diagnosis. | Replace cable or monitor; consider graphics card repair or replacement. |
| Discoloration (e.g., yellow tint) | Failing backlight, faulty monitor panel, color settings | Check monitor color settings; try adjusting brightness and contrast; consider professional repair or replacement. | Adjust color settings; replace monitor. |
Examples of Visual Defects
Visual defects can provide valuable clues to the underlying problem. Here are some examples:
- Ghosting: A faint image trails behind the main image, often seen in fast-moving scenes. This usually points towards issues with the monitor’s response time or refresh rate.
- Dead Pixels: Individual pixels that remain permanently black or a fixed color. A small number of dead pixels is often acceptable, but excessive dead pixels indicate a failing panel.
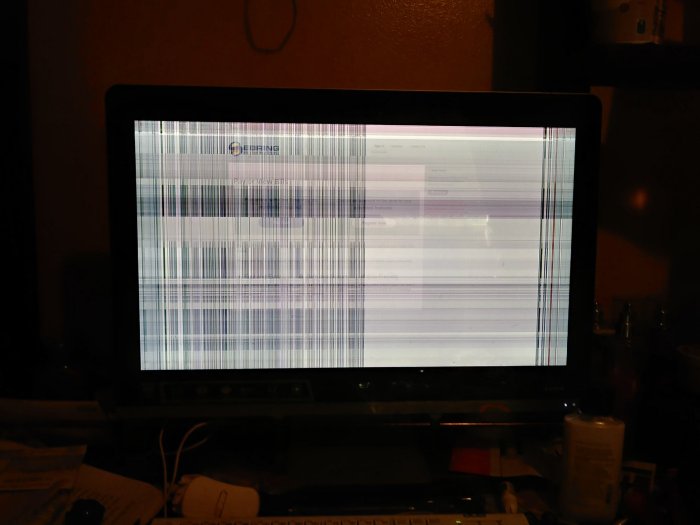
- Horizontal/Vertical Lines: These are often indicative of damage to the monitor’s internal components or a failing connection.
- Color Banding: Noticeable bands of color across the screen, suggesting a problem with color processing or the display panel itself.
- Screen Tearing: A visual distortion where the image appears to be split horizontally, typically caused by a mismatch between the monitor’s refresh rate and the graphics card’s output.
Checking Basic Connections
Before investigating more complex issues, always check the basic connections. Loose or faulty cables are a frequent cause of monitor problems.
Power Cable: Ensure the power cable is securely connected to both the monitor and the wall outlet. A loose connection might result in an intermittent display or no display at all. Look for any visible damage to the cable itself.
Video Cable: Similarly, inspect the video cable (HDMI, DisplayPort, DVI, VGA) connecting the monitor to your computer. Make sure it’s firmly plugged into both the monitor and the computer’s graphics card (or motherboard). A loose connection might cause flickering, blurry images, or no display. Look for bent pins or any physical damage to the cable. A visual cue indicating a connection issue might be a distorted image, intermittent display, or complete lack of signal.
Testing and Troubleshooting
Once you’ve identified a potential problem with your monitor, the next step is to systematically test and troubleshoot to pinpoint the exact cause. This process helps determine whether the issue lies with the monitor itself, the computer, or the connection between them. By following a structured approach, you can efficiently resolve the problem and get your display working correctly again.
A crucial first step is isolating whether the problem originates from the monitor or the computer. This is easily achieved by connecting the monitor to a different computer or device, such as a laptop or another desktop. If the monitor works correctly with the alternative device, the problem lies with your original computer’s video card, graphics drivers, or system settings. Conversely, if the monitor continues to malfunction, the issue is likely with the monitor itself.
Monitor Settings Verification and Adjustment
Proper monitor settings are essential for optimal display performance. Incorrect settings can lead to various problems, including blurry images, incorrect colors, and even a complete lack of display. It’s vital to check and adjust these settings if necessary.
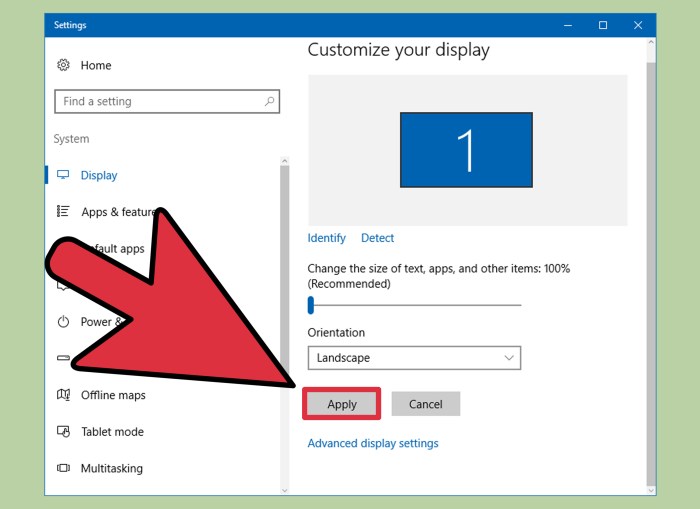
- Resolution: The resolution determines the clarity and sharpness of the image. Check your monitor’s native resolution (usually found in the monitor’s specifications or online) and ensure your computer is set to this resolution. Using a lower resolution may result in a blurry image, while using a higher resolution than supported can lead to display issues. To adjust, typically access display settings through your operating system’s control panel or system settings.
- Refresh Rate: This setting controls how many times per second the image is refreshed. A higher refresh rate results in smoother motion, especially beneficial for gaming. However, using a refresh rate higher than your monitor supports can also cause problems. Again, check your monitor’s specifications and adjust accordingly within your operating system’s display settings.
- Input Source: Monitors often have multiple input ports (e.g., HDMI, DisplayPort, VGA). Make sure your computer’s video output cable is connected to the correct input source on the monitor. Most monitors display the active input source on the screen, often indicated by a small text label or LED light. If necessary, use the monitor’s buttons to cycle through available inputs until you find the correct one.
Power Cycling the Monitor and Computer
A simple yet often effective troubleshooting step is to perform a power cycle. This involves completely turning off both the monitor and the computer, waiting for a short period, and then turning them back on. This process can clear temporary glitches and reset various components, resolving minor software or hardware issues.
To power cycle, completely shut down your computer using the proper shutdown procedure (don’t just turn off the power switch). Then, unplug the power cord from both your monitor and your computer. Wait at least 30 seconds before plugging the power cords back in and turning the devices on. This ensures that all residual power is discharged, providing a clean restart. This simple step often resolves transient problems and can be surprisingly effective.
Advanced Diagnostics and Solutions
Addressing more complex monitor issues requires a deeper understanding of the technology involved. This section will explore diagnosing and resolving problems beyond simple cable connections or driver issues, focusing on internal component failures and panel-specific problems. We will delve into advanced diagnostic techniques and repair solutions for common monitor malfunctions.
Diagnosing complex monitor problems often necessitates a methodical approach. Understanding the underlying technology of different monitor types is crucial for effective troubleshooting. LCD, LED, and OLED panels, while all displaying images, have distinct structures and failure points.
Monitor Panel Types and Failure Modes
Different monitor panel technologies exhibit varying failure modes. Understanding these differences is key to accurate diagnosis. LCD monitors, while generally robust, can suffer from backlight failures, resulting in a dark screen despite a functioning panel. LED monitors, using LEDs for backlighting, can experience individual LED failures, causing dim spots or lines. OLED panels, while offering superior contrast, are susceptible to burn-in from static images displayed for extended periods.
Advanced Diagnostics and Repair Solutions
The following table details common advanced monitor problems, their symptoms, diagnostic tests, and potential repair solutions. Note that some repairs may require professional expertise.
| Problem | Symptom | Diagnostic Test | Repair Solution |
|---|---|---|---|
| Backlight Failure (LCD/LED) | Completely dark screen, no image visible, but power light may be on. | Check power supply, inspect backlight LEDs (if accessible) for damage or lack of illumination. | Backlight replacement (often requires professional repair). |
| Dead Pixels (LCD/LED/OLED) | One or more pixels remain stuck on a single color (red, green, blue, or black). | Visual inspection. Use a dead pixel test pattern to identify affected pixels. | Dead pixels are usually a manufacturing defect and are generally not repairable. Warranty may apply. |
| Internal Component Failure (e.g., Inverter, Power Supply) | No power, flickering screen, buzzing sound, inconsistent power. | Check power supply voltage, listen for unusual sounds, inspect internal components (if accessible) for damage. | Replacement of faulty component (requires technical expertise and often specialized tools). |
| Burn-in (OLED) | Persistent faint image ghosting from static elements previously displayed. | Observe the screen for residual images after prolonged use. | Pixel refresh functions can sometimes mitigate, but burn-in is often permanent. |
Troubleshooting a Monitor with No Display
A flowchart can provide a structured approach to resolving a monitor that displays nothing. The following steps represent a logical sequence for effective troubleshooting.
Imagine a flowchart. It would start with a diamond shape asking “Is the monitor powered on?”. If yes, it proceeds to a rectangle “Check the video cable connection”. If no, it goes to a rectangle “Check the power cord and outlet”. From “Check the video cable connection”, a diamond asks “Is the cable securely connected?”. If yes, it leads to a rectangle “Try a different cable”. If no, it leads to the same rectangle. From “Try a different cable”, a diamond asks “Is there an image?”. If yes, it ends with “Cable issue resolved”. If no, it proceeds to a rectangle “Check the input source on the monitor”. From “Check the input source on the monitor”, a diamond asks “Is the correct input source selected?”. If yes, it goes to a rectangle “Check the graphics card on your computer”. If no, it leads to the same rectangle. From “Check the graphics card on your computer”, a diamond asks “Is the graphics card functioning correctly?”. If yes, it goes to a rectangle “Test with another monitor”. If no, it goes to a rectangle “Check the computer’s video output settings”. From “Test with another monitor”, a diamond asks “Does the other monitor work?”. If yes, it ends with “Monitor issue”. If no, it ends with “Computer issue”. From “Check the computer’s video output settings”, a diamond asks “Are the settings correct?”. If yes, it goes to a rectangle “Try different resolution”. If no, it goes to the same rectangle. From “Try different resolution”, a diamond asks “Is there an image?”. If yes, it ends with “Resolution issue resolved”. If no, it goes back to “Check the graphics card on your computer”.
Wrap-Up
Successfully diagnosing computer monitor problems requires a methodical approach, combining careful observation with targeted testing. By following the four steps Artikeld—identifying the problem, testing and troubleshooting, conducting advanced diagnostics, and implementing solutions—you can effectively resolve a wide range of display issues. Remember, isolating the problem (monitor versus computer) is crucial for efficient repair. With a little patience and these practical techniques, you can restore your computer’s display to its optimal performance.