Understanding electrical wiring issues is crucial for home safety and preventing costly repairs. This guide delves into eight common problems, providing clear explanations, visual examples, and practical troubleshooting steps. We’ll explore the symptoms, causes, and potential dangers associated with each issue, equipping you with the knowledge to identify and address these problems effectively and safely.
From identifying frayed wires to understanding the complexities of faulty circuit breakers, we’ll cover a range of scenarios. We’ll also discuss preventative maintenance and the importance of regular electrical inspections to mitigate risks and extend the lifespan of your home’s electrical system. The information provided aims to empower you to make informed decisions regarding your home’s electrical safety.
Identifying Common Electrical Wiring Problems
Understanding common electrical wiring issues is crucial for ensuring home safety and preventing costly repairs. Neglecting these problems can lead to fire hazards, electrical shocks, and malfunctioning appliances. This section details eight prevalent wiring problems, their causes, symptoms, and potential dangers.
Loose Connections
Loose connections are a frequent cause of intermittent power outages or flickering lights. Imagine a wire terminal in a junction box, where the screw holding the wire isn’t tightened sufficiently. The wire vibrates slightly, causing intermittent contact and resulting in inconsistent power flow. This can lead to overheating at the connection point, potentially igniting nearby materials. Over time, the repeated breaking and making of contact can damage the wire and the terminal itself, requiring replacement.
Overloaded Circuits
Overloaded circuits occur when too many appliances or devices draw power from a single circuit, exceeding its amperage rating. Picture a circuit breaker designed for 15 amps powering a space heater (10 amps), a microwave (8 amps), and several lamps (2 amps) simultaneously. The total amperage surpasses the circuit’s capacity, causing the breaker to trip or, worse, the wires to overheat and potentially start a fire. This often manifests as tripped breakers, dimming lights, or warm outlets.
Damaged Insulation
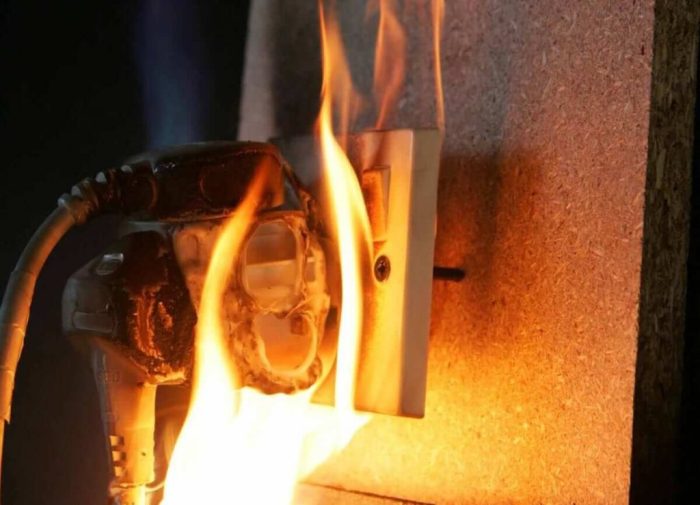
Damaged insulation exposes bare wires, creating a significant shock hazard and fire risk. Imagine a frayed wire exposed to the elements, its copper strands visibly separated and oxidized. Moisture and debris can easily contact the exposed conductors, leading to short circuits and potential electrocution. This is particularly dangerous in damp areas like bathrooms or basements. Symptoms include sparking, buzzing sounds from outlets, or even a burning smell.
Improper Grounding
Improper grounding creates a path for stray electrical current to flow through conductive objects, posing a serious shock hazard. Imagine a metal appliance casing that’s not properly grounded. If a fault occurs within the appliance, the current could flow through the casing, potentially electrocuting anyone who touches it. This often goes unnoticed until a shock occurs, highlighting the importance of regular safety checks.
Short Circuits
Short circuits occur when a live wire makes unintended contact with a neutral wire or ground, resulting in a sudden surge of current. Picture a situation where bare wires touch due to damaged insulation or faulty wiring. This creates a low-resistance path for the current, leading to immediate overheating and potentially a fire. Symptoms include blown fuses or tripped breakers, sparking, and potentially a burning smell.
Incorrect Wiring
Incorrect wiring, such as reversed polarity (hot and neutral wires swapped), creates safety hazards and can damage appliances. Imagine an outlet where the hot and neutral wires are reversed. This could cause appliances to malfunction, possibly leading to electrical shocks or fires. It might not always present obvious symptoms, emphasizing the importance of professional installation and inspection.
Aluminum Wiring
Aluminum wiring, commonly found in older homes, is prone to oxidation and overheating, creating a fire hazard. Imagine aluminum wires in a junction box where the connections have become loose due to oxidation. The loose connections increase resistance, leading to overheating and the potential for a fire. This often manifests as warm outlets or flickering lights.
Old or Deteriorating Wiring
Old or deteriorating wiring becomes brittle and prone to breakage, creating various hazards. Imagine wires in a wall that have been exposed to decades of heat and vibration, causing them to become brittle and prone to cracking. This can lead to loose connections, short circuits, and fire hazards. This is often discovered during renovations or repairs, highlighting the importance of periodic inspections.
Comparison of Electrical Wiring Issues
| Wiring Issue | Symptoms | Causes | Potential Dangers |
|---|---|---|---|
| Loose Connections | Intermittent power, flickering lights, warm outlets | Loose screws, vibration, corrosion | Overheating, fire hazard |
| Overloaded Circuits | Tripped breakers, dimming lights, warm outlets | Too many appliances on one circuit | Overheating, fire hazard |
| Damaged Insulation | Sparking, buzzing, burning smell | Physical damage, age, rodent damage | Electric shock, fire hazard |
| Improper Grounding | Electric shock when touching appliances | Faulty grounding, missing ground wire | Electric shock, potential death |
| Short Circuits | Blown fuses, tripped breakers, sparking, burning smell | Bare wires touching, damaged insulation | Fire hazard, damage to appliances |
| Incorrect Wiring | Malfunctioning appliances, electric shock | Improper installation, reversed polarity | Electric shock, fire hazard, appliance damage |
| Aluminum Wiring | Warm outlets, flickering lights | Oxidation, loose connections | Overheating, fire hazard |
| Old/Deteriorating Wiring | Intermittent power, sparking, burning smell | Age, heat, vibration | Loose connections, short circuits, fire hazard |
Troubleshooting Techniques for Electrical Wiring Faults
Safe and effective troubleshooting of electrical wiring faults requires a systematic approach, combining careful observation with the appropriate testing equipment. Ignoring safety precautions can lead to serious injury or even death. Always de-energize circuits before working on them, and if unsure, consult a qualified electrician.
Troubleshooting techniques vary depending on the specific fault, but a general methodology involves visual inspection, testing with appropriate tools, and methodical isolation of the problem area. This process often requires patience and a methodical approach to ensure accurate diagnosis and repair.
Visual Inspection Procedures
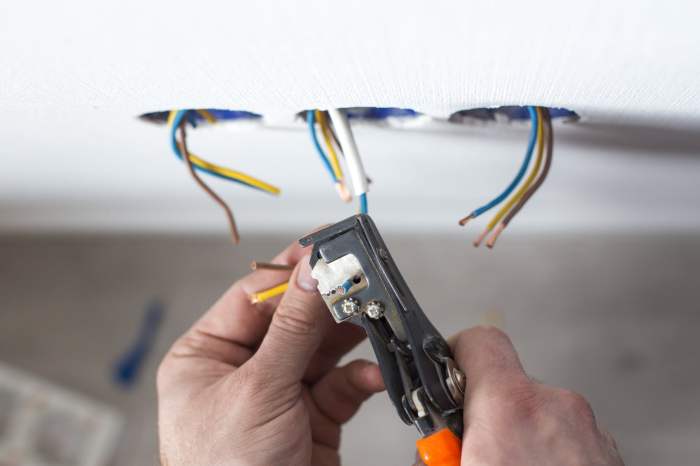
A thorough visual inspection is the first step in troubleshooting any electrical wiring issue. This involves carefully examining all visible wiring, connections, and components for signs of damage, such as frayed wires, loose connections, burn marks, or corrosion. Pay close attention to areas where wires enter junction boxes, outlets, and switches. Look for any signs of overheating, such as discoloration or melting of insulation. Proper documentation of observations, including photos if possible, is crucial for effective troubleshooting and future reference.
Testing with Multimeters and Voltage Testers
Multimeters and voltage testers are essential tools for diagnosing electrical wiring problems. They allow for precise measurements of voltage, current, and resistance, helping to pinpoint the location and nature of the fault.
The use of these testing methods provides critical information for accurate fault diagnosis. Improper use can lead to inaccurate results or even injury. Always ensure the meter is set to the correct range and that you understand the safety precautions associated with its use.
- Multimeter Usage: Multimeters measure voltage, current, and resistance. For instance, checking the resistance of a circuit can help identify a break in the wire. Measuring voltage across a component can determine if it’s receiving power. Measuring current can identify an overload situation.
- Voltage Tester Usage: Voltage testers are simpler devices that primarily indicate the presence or absence of voltage. They are useful for quickly checking if power is present at an outlet or switch, providing a first step in troubleshooting a circuit.
Step-by-Step Troubleshooting for a Tripped Breaker
A tripped breaker is a common electrical problem indicating an overload or short circuit. The following steps illustrate a systematic approach to troubleshooting:
- Safety First: Turn off the main power breaker to ensure complete de-energization of the circuit.
- Identify the Tripped Breaker: Locate the breaker that has tripped. It will usually be in the “off” position.
- Reset the Breaker: Carefully reset the tripped breaker by switching it to the “on” position.
- Observe for Retripping: If the breaker immediately trips again, there is a persistent fault in the circuit. Do not repeatedly try to reset the breaker.
- Investigate the Circuit: Identify the devices connected to the affected circuit. Unplug all devices and appliances from that circuit.
- Check for Overloads: Assess whether too many appliances were drawing power from the circuit simultaneously, exceeding its capacity. Consider distributing the load to other circuits if necessary.
- Inspect for Short Circuits: Examine the wiring, appliances, and connections on the circuit for any signs of damage, such as frayed wires, loose connections, or burn marks.
- If the problem persists, call a qualified electrician.
Flowchart for Troubleshooting a Tripped Breaker
The flowchart would visually represent the steps above. It would start with “Breaker Tripped?” A “yes” branch would lead to “Safety First,” followed by steps to identify the tripped breaker, reset it, and observe if it retrips. If it retrips, a branch would lead to “Investigate Circuit,” including checking for overloads and short circuits. If no retripping occurs, the flowchart would conclude with “Problem Resolved.” A “no” branch from the initial question would indicate a different issue requiring different troubleshooting steps.
Safe Repair and Prevention Strategies
Addressing electrical wiring issues requires a cautious and methodical approach. Improper repairs can lead to further damage, electrical fires, or severe injury. This section details safe repair methods for various wiring problems, emphasizing safety precautions and preventative measures. Remember, if you are uncomfortable working with electricity, it is always best to consult a qualified electrician.
Safe Repair Procedures for Common Wiring Problems
Safe and effective repair of electrical wiring problems depends heavily on correctly identifying the issue. Each problem requires a specific approach, and neglecting safety precautions can have serious consequences. The following Artikels safe repair procedures, categorized by wiring issue type (assuming the eight types have already been detailed previously). Always de-energize the circuit before commencing any repair work by switching off the appropriate breaker at the electrical panel.
Loose Connections
Loose connections are often the source of intermittent power failures or sparking. Repair involves tightening the connection. Safety precautions include: ensuring the power is off, using appropriate insulated tools, and visually inspecting the connection for damage before re-energizing the circuit. If the connection remains loose after tightening, the wire terminals or connectors may need replacement.
Overloaded Circuits
Overloaded circuits are usually addressed by distributing the load across multiple circuits or upgrading the circuit breaker to a higher amperage (only done by a qualified electrician). This prevents overheating and potential fires. Safety precautions include: correctly identifying the overloaded circuit, turning off unnecessary appliances, and never exceeding the circuit’s rated capacity.
Damaged Insulation
Damaged insulation exposes bare wires, posing a significant shock hazard. Repair involves replacing the damaged section of wire with new insulated wire, ensuring proper splicing and insulation. Safety precautions include: using appropriate insulated tools, carefully stripping the wire without nicking the conductor, and using electrical tape or heat-shrink tubing to ensure complete insulation. Never attempt to repair severely damaged wiring; replace the entire section.
Incorrect Wiring
Incorrect wiring can lead to malfunctioning appliances or electrical hazards. Repair involves tracing the wiring, identifying the incorrect connections, and correcting them according to the electrical code. Safety precautions include: meticulous tracing of the wiring, using a wiring diagram as a reference, and double-checking all connections before re-energizing the circuit. Consult an electrician if you are unsure about proper wiring configurations.
Faulty Outlets or Switches
Faulty outlets or switches can be a fire hazard or cause electrical shocks. Repair often involves replacing the faulty component. Safety precautions include: de-energizing the circuit, using appropriate tools, and ensuring the replacement component is compatible with the existing wiring and electrical code. Always double-check the connections before re-energizing the circuit.
Ground Faults
Ground faults occur when a live wire makes contact with a grounded surface. Repair involves tracing the fault and correcting the underlying issue, often involving replacing damaged wiring or components. Safety precautions include: using a ground fault circuit interrupter (GFCI) to protect against shocks, carefully tracing the ground fault, and replacing any damaged or compromised components.
Corrosion
Corrosion on wire connections can lead to poor conductivity and overheating. Repair involves cleaning the connections with a wire brush and applying a corrosion inhibitor. Safety precautions include: ensuring the power is off, using appropriate insulated tools, and carefully cleaning the connections without damaging the wires. If corrosion is severe, replace the affected wires or connectors.
Arcing
Arcing is a visible spark caused by a high-voltage discharge. Repair requires identifying and addressing the root cause, which might include loose connections, damaged insulation, or overloaded circuits. Safety precautions include: immediately turning off the power, investigating the cause of the arcing, and never attempting repairs while arcing is present. Call a qualified electrician immediately.
Preventative Measures to Minimize Future Wiring Problems
Regular preventative maintenance significantly reduces the likelihood of future wiring problems. Implementing these measures safeguards your electrical system and minimizes the risk of hazards.
- Regularly inspect wiring for signs of damage, such as frayed insulation, loose connections, or corrosion.
- Avoid overloading circuits by distributing electrical loads evenly across multiple circuits.
- Use surge protectors to protect sensitive electronics from power surges.
- Schedule regular inspections by a qualified electrician, especially in older homes.
- Never attempt DIY repairs if you lack the necessary knowledge and experience.
- Ensure proper grounding of all electrical appliances and systems.
- Replace outdated wiring and components as needed.
- Keep electrical panels and junction boxes free from obstructions.
Final Thoughts

Successfully diagnosing and addressing electrical wiring issues requires a combination of knowledge, careful observation, and safe practices. This guide has provided a comprehensive overview of eight common problems, offering practical steps for troubleshooting and repair. Remember, prioritizing safety is paramount; when in doubt, consult a qualified electrician. By understanding these issues and employing preventative measures, you can significantly reduce the risk of electrical hazards and ensure a safe and functional home environment.